A Tutorial on Chart Reading
A number of the patterns I have released recently include knitting charts. Charts are a useful tool for knitters because they can compress a lot of written information into a small “picture” of the written text. Over the next few newsletters, I will be presenting the basics of chart reading. Hopefully, these will help you better utilize this wonderful knitting tool.
The first thing to understand is that knitting charts start at the bottom and work toward the top. This is completely backward to the way that you normally read, but is perfectly logical if you think about the order that you knit the stitches on your project. You build from the bottom of your knitting (cast on edge) to the top (bind off edge).
The second thing to understand with knitting charts is that the type of knitting you are doing – flat or in the round – influences the type of chart. Though confusing at first, there is a simple explanation. Knitting charts are written from the perspective that you would knit a project. Since that perspective is slightly different depending on whether you are knitting in the round (where you are always working from right to left) or flat (where you work back and forth on the piece), the charts change slightly to reflect that shift. We will deal with each of these individually. I will begin with flat knitting since most of the charts you see will be relating to flat knitting.
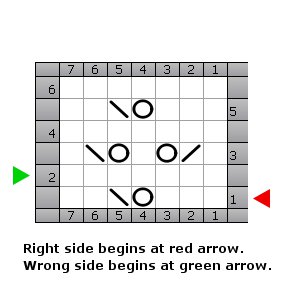
With charts representing flat knitting, it is necessary to read the right side rows in one direction and the wrong side rows in a different direction. In the illustration below, you will notice that there are arrows indicating the starting for right side and wrong side rows.
If you notice, the numbering for the odd numbered rows are all at the right side of the chart and the even numbers are at the left side of the chart. So to read this chart, you would begin at the red arrow and work from right to left and then work the even rows beginning at the left side of the chart and working toward the right. Any time you see a chart that has numbering on both the right and left side, you will know that the chart represents flat knitting.
The other essential ingredient of knitting charts is the chart key. Though there are some standard conventions for what symbols mean, every chart should have a key that defines what the symbols mean. For the purposes of our chart and for the remainder of the lessons on chart reading, we will refer to the following key:

You will notice that the Key defines different stitches for the right and wrong side of the chart. For example, an open square is a Knit stitch on the right side of the work and a Purl stitch on the wrong side of the work.
In our chart, Row 1 of our pattern would be expressed in written terms as:
Row 1 – K3, yo, ssk, k2.
While Row 2 would translate as:
Row 2 – P7.
Using the same procedure, the rest of the chart translates as follows:
Row 3 – K1, k2tog, yo, k1, yo, ssk, k1.
Row 4 – P7.
Row 5 – K3, yo, ssk, k2.
Row 6 – P7.
The same chart can be expressed without the WS rows to make a more compact chart.

Rows 1, 3 and 5 are still pictured exactly the same as the larger chart but here the chart only expresses the Right Side rows. This sort of chart is frequently used when the Wrong Side or even rows are all the same stitch. In the case of our chart, the Wrong Side rows are all purled. You will find a note within the pattern, usually near the chart itself, explaining how WS rows are worked.
In our next installation on chart reading, we will deal with chart reading for knitting in the round.