Home » Archives for tabitha » Page 3

Author: tabitha

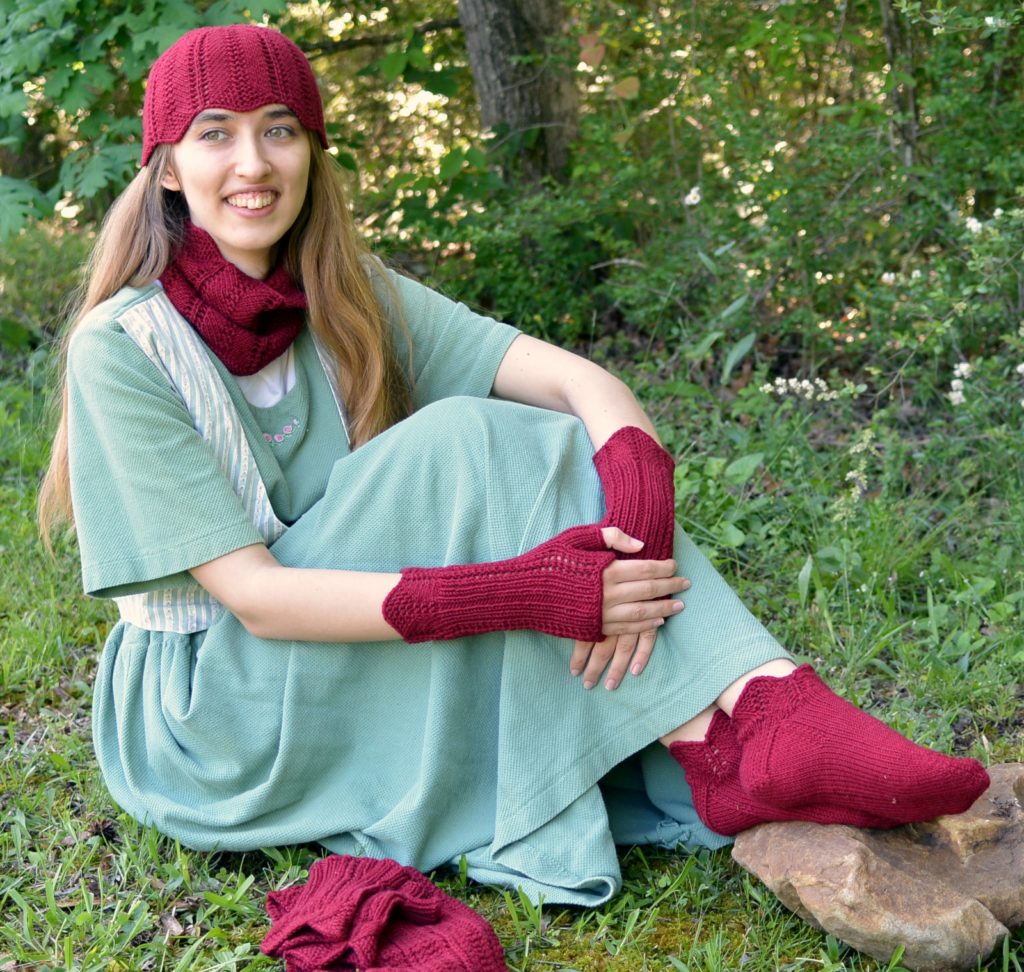
Arwen's Elven Accessories in Wine

Arwen Gets a Facelift (pattern updates galore)

Arwen pattern updates

If you have followed me for long, you will know that I have been updating some of my older patterns. Some patterns only needed a simple change of layout. But some of my older patterns, like my popular Arwen series of accessories,  needed a full on facelift since my writing style has changed quite a bit.
I updated Arwen wrap a while ago so the rest of the series was long overdue for their updates. I am happy to say that Arwen has received a complete makeover – updated instructions, new charts, extended sizing, new photography, and other bonuses. My friend Luciana knit fresh samples.  Don’t you love the gorgeous wine colorway of Valley Yarns Northfield? You will be seeing the completely revised and freshly tech edited versions of Arwen cloche, Arwen fingerless gloves, Arwen slipper socks, Arwen cowl, and Arwen keyhole scarf  appearing on Ravelry starting next week. If you already have a copy of the patterns, you will receive the updates automatically. You won’t have to do a thing.  If you don’t have them in your library, grab your copy today before the price increases. Here is the link.

Knitting Tools shop update

You may have noticed my Etsy shop has been in vacation mode for most of the month. This is because I have decided to host my Knitting Tools shop on my website. This change will allow me improve your shopping experience in several ways. It gives me more flexibility to organize my products. And it allows me to offer some great knitting tools that weren’t an option before. You will still see my line of project bags and stitch markers, but coming soon you will also be able to purchase print versions of my patterns and books, pattern kits, and hopefully soon, yarn. And you won’t have to remember another web address when you’re ready to shop!
It will take me a few weeks to get my new shop fully operational. I have the basics set up but now I need to add the important things like products. During this time I will be making a lot of decisions about which products to keep and which to allow to lapse into obscurity. So if you have suggestions of things you would like to see in my new shop or if you’re desperate for a project bag NOW, give me a shout via the Contact tab. Look for further news on this change in the coming weeks here and on social media.

Look out Aragorn. You’re next.


The Secret to Writing a Great Style Sheet (and why your patterns need one)

So, what is a style sheet anyway?

Think of it as a map for making sure one of your patterns matches the next in wording and visual appearance. It is a collection of preferences that you use in formatting your patterns to create a cohesiveness in your brand.


Do I really have to have a style sheet?

No, it isn’t essential to have a style sheet but it is pretty important. Having one will help you create a consistent look and feel for your patterns that will become a vital part of your brand. It will speed up the procedure of writing a pattern since you will be able to reuse some of the information in every pattern. A style sheet will also make the process of tech editing easier since your editor won’t have to keep asking questions about the pesky details of pattern writing, like where you like commas.


What do you put in a style sheet?

Your style sheet will include quite a few parts of your basic pattern. It will include the elements that affect the basic look of your pattern as well as the pertinent information that the knitter will need to successfully complete the pattern. Here are the basic things that you need to include in your style sheet.

Basic layout

  • Preferred fonts and colors (choose something easy to view in both print and electronic format).
  • Where elements will be positioned on the page and within the pattern (what order do you want the size, materials, gauge, needles, etc.)
  • Cover page layout (photos, title, romance text and/or essential pattern information)

Essential information

  • Sizing information
  • Ease and/or fitting suggestions
  • Materials (yarn, needles, notions)
  • Gauge (including stitch pattern)
  • Abbreviations
  • Necessary skills or skill level

Pattern instructions

  • Construction notes
  • Stitch patterns
  • Main pattern instructions (together or divided by section)
  • Charts
  • Finishing notes

Extra bits

  • Page numbering, revision date, etc.
  • Copyright information
  • Contact information
  • Acknowledgements
  • About the designer

This is scary. Where do I start?

The good news is you don’t have to do everything all at once. The better news is that there is help available. A great place to start is to look at books and magazines. Though patterns in books and magazines may be terser than you like, you will still see the items that are needed and the importance of having things look alike from pattern to pattern. Online magazines, like Knitty and Knotions, are another great resource. You can find the Knitty style sheet here: [Knitty Submission information (style sheet is just under the mailing list sign up for)] and the Knotions style sheet here: [Knotions Submissions information (look for the Submissions guide link)]. Next, review pattern layouts from patterns that you like, paying special attention to the things that appeal to you.  Finally, don’t be forget to ask your tech editor for assistance with the process.

The Secret

The secret about writing a great style sheet is that it really isn’t difficult. A style sheet is only a collection of things you know instinctively and may be doing automatically. Writing down these things will make sure you write your patterns the same way every time. These resources will be your guide to building your own style sheet and taking your knitting and crochet patterns to the next level. Best of all, you don’t have to have a complete and perfect style sheet before you begin writing patterns. Simply start the process. Every decision you make can be put into action immediately. Then you can build on that decision with another decision and another decision until you will have your own style sheet.

Happy writing!


PS: If you are really stumped, feel free to contact me for help putting together your style sheet. I am even working on a handy checklist.

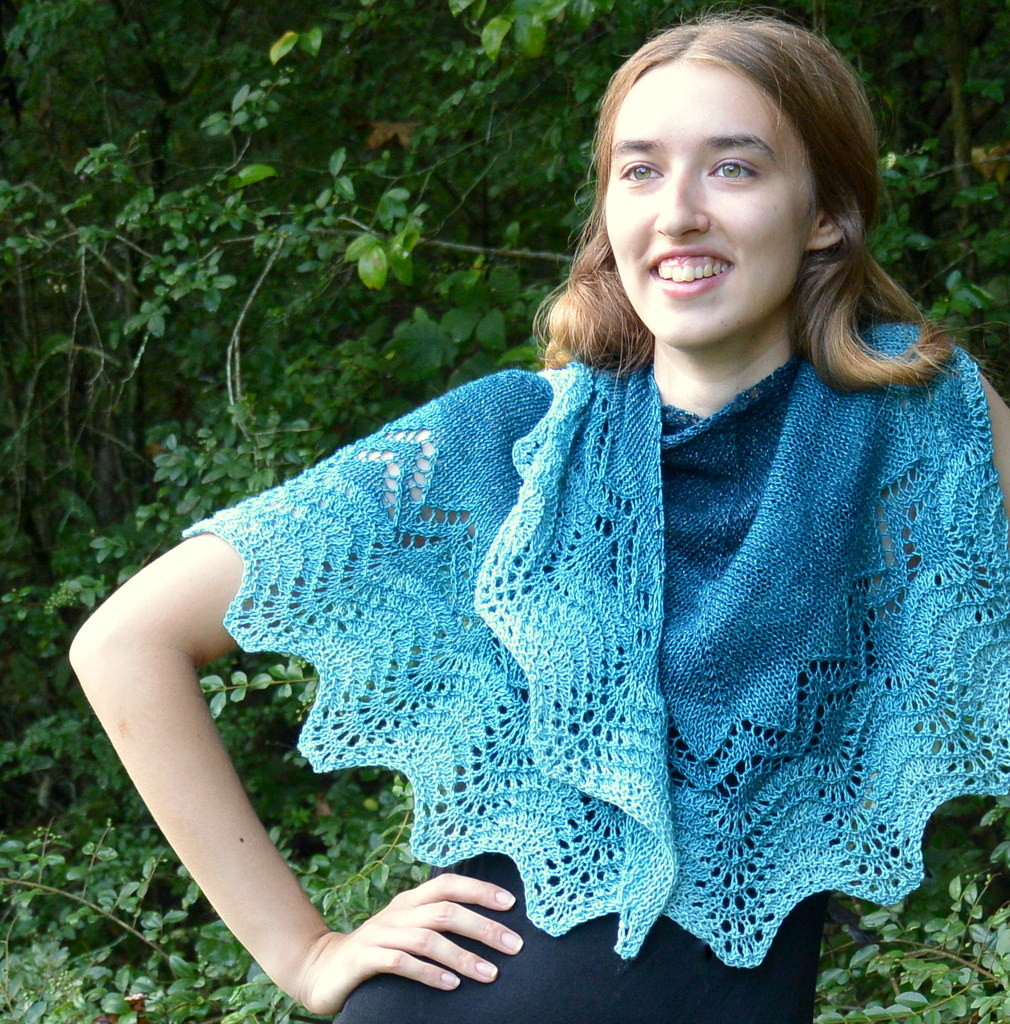
Gulf Breezes Shawl pattern shown in Beachy Keen gradient set

Gulf Breezes Pattern Update

In my continuing effort to bring you the best patterns possible, Gulf Breezes shawl pattern has been completely updated and revised.

What’s New?

Knitters now have the option of working the lace sections with either charted or written instructions. Chart lovers rejoice! I am particularly excited about these charts because they fit so nicely on the page and are so easy to read. I have also included tips for working this pattern in a mini-skein gradient set like The 100th Sheep Color Concepts.

About the pattern

You will find this versatile little shawl will be a wardrobe essential. You can wear it as a wrap for those cool evenings, a topper for a sundress, or a chic kerchief-style scarf, or even wear it tied around the hips as a beach cover up when tied around the hips.

Construction and Required Skills

The shawl is knit from the center back down using a single 100-gram skein of luxury sock yarn. You will love how the unusual shaping helps it stay on the shoulders nicely. Advanced Beginners wanting to stretch their skills and Intermediate knitters who want a relaxing knit will both love the pattern. Techniques required: basic stitches, increases, decreases, simple shaping, basic lace techniques (yo, k2tog, ssk, sk2p, M1, kfb, kfbf). The pattern was written for a 490 yd skein of yarn but is easy to adjust for smaller skeins of yarn or a gradient set.

Thank you to Sarah for the fresh tech edit, and to my testers, Cath, Eliesa, and Melinda for checking the new version.

Pattern available through Ravelry and Etsy. Print copies available through Etsy on request.

$5.95

If you need pattern help or just want to show off your work, visit the Tabitha’s Heart Ravelry group. I love to see finished projects. Use hashtag #tabithasheart on social media and your project may be selected to be featured in my feed. And periodically, I choose a name for a random giveaway.

Tutorial – Knitting German Short Rows

The Truly Magical German Short Row


I have a confession to make. For years, I have tried to love short row heels and toes without success. I do not like wrapping stitches, I like picking up wraps even less, and I detest the holes that inevitably show at the points where I turned. I try, I rip, and I end up going right back to my favorite provisionally cast on toe and gusseted heel. But I also confess, that there are some advantages to short row heels and toes. For example, they’re nicely balanced for adding contrast colors (something that’s not the case with gusseted socks).

I thought I was destined to a life without pretty contrast heels, and then, I was bitten by the Dreambird Shawl bug. What does a shawl have to do with socks? Simple. Short rows. The thing that makes Dreambird work is short row shaping. And the thing that keeps you from losing your sanity after the eleventy-billionth wrapped stitch is a delightful little technique called German short rows.

What are German short rows, you ask? They are quite simply the most magical knitting technique since the invention of the knit stitch. They are the answer to your short row prayers and a reason to give short row heels another go. They are so ridiculously simple you will wonder why it works and why you didn’t think of it yourself. They may be the rainbow unicorns of the knitting world. Who invented German short rows, you ask? I have absolutely no clue but I’m guessing it was a German knitter who hated short row wraps as much as I do.

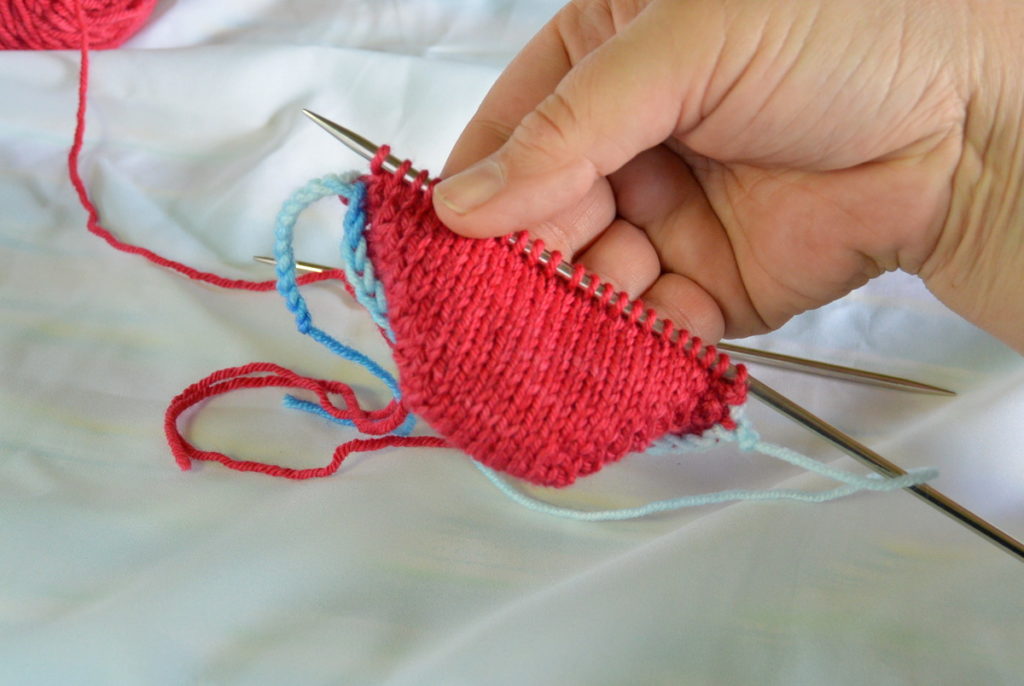
The technique revolves around something called a Double Stitch, which is really just a regular stitch pulled out of shape. The process of pulling that stitch out of shape closes the hole made at the point of a short row turn. The process completely defies logic (it would make Mr. Spock’s head explode) but stay with me and I promise you something magical in the journey. For our purposes, I will explain the technique in the context of a sock toe but the same technique will work on a heel (or a shawl or sweater) just as easily.

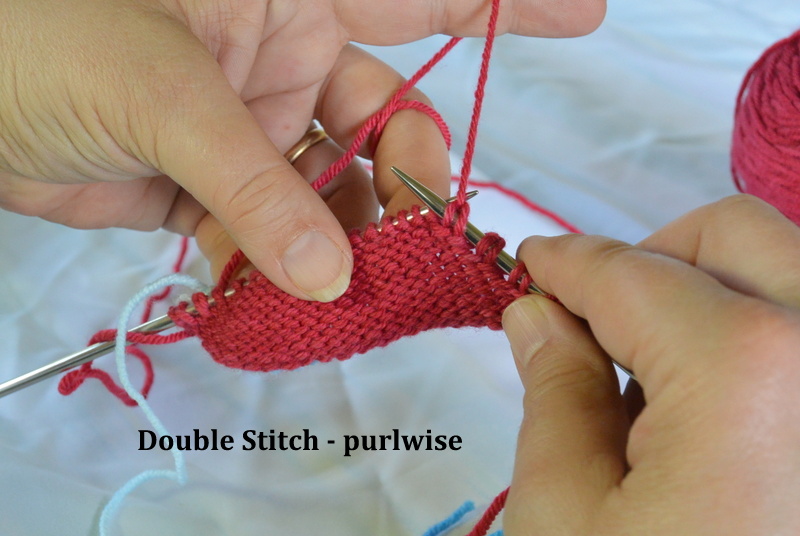
To make a double stitch, work to the point in the pattern where you would ordinarily wrap a stitch. Now, instead of doing the yarn-moving slip-stitch-wrapping short row dance with that stitch, knit or purl the stitch (depending on the pattern) then turn your work. No wrapping needed. Don’t write me off as crazy just yet. With your work turned, bring the working yarn to the front and slip purlwise the stitch you were supposed to wrap. Carry the working yarn over the top of your needle and to the back of the work. Pull the working yarn until the legs of the stitch below the slipped stitch are exposed, forming two little legs.
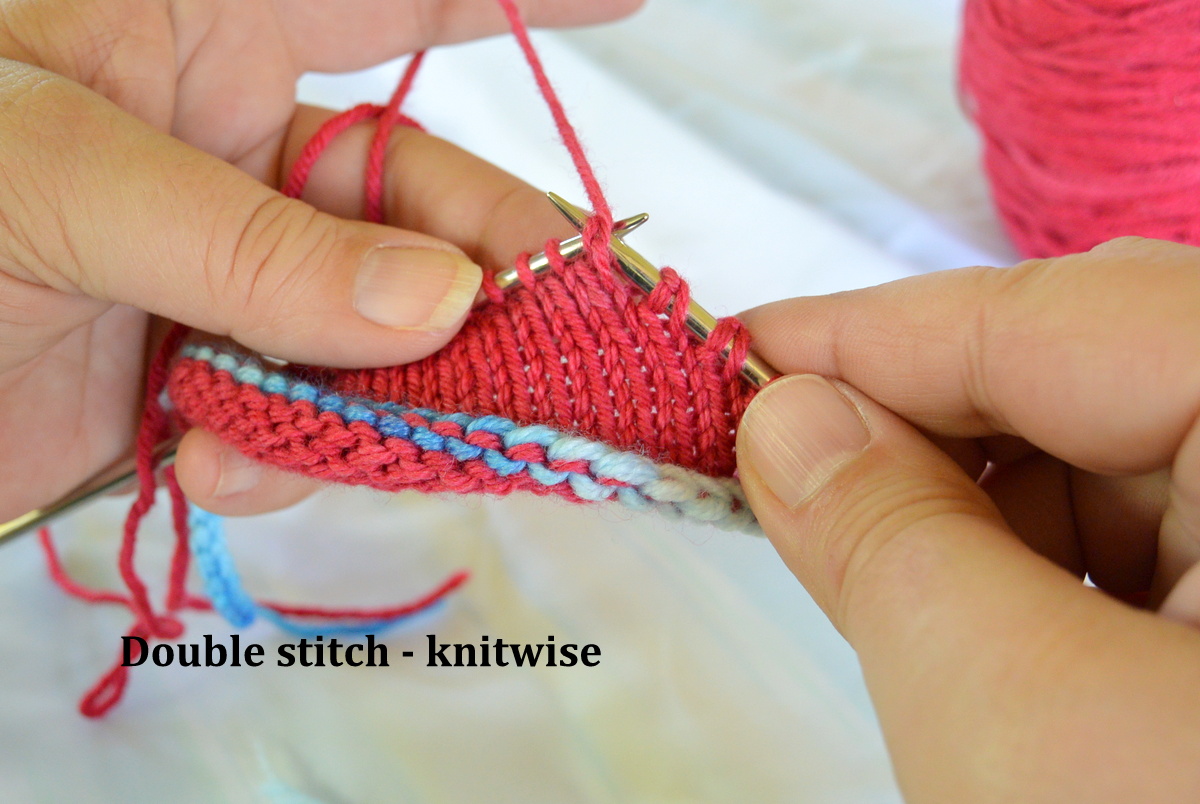
 

Double stitch - knitwise

Double stitch - purlwise

On top of the needle, you will see a little, crossed bit of yarn that indicates the intersection of the slipped stitch and the stitch below it. On the back of the needle, you will see the two legs of the slipped stitch. If it sounds weird, just think back to when you first started knitting and you accidentally added stitches to your row but didn’t know how. Remember, that how turned out you were making new stitches because you carried the working over the top of the needle instead of under it? Well, that is exactly what you are doing here. Only this time, you’re doing it on purpose.
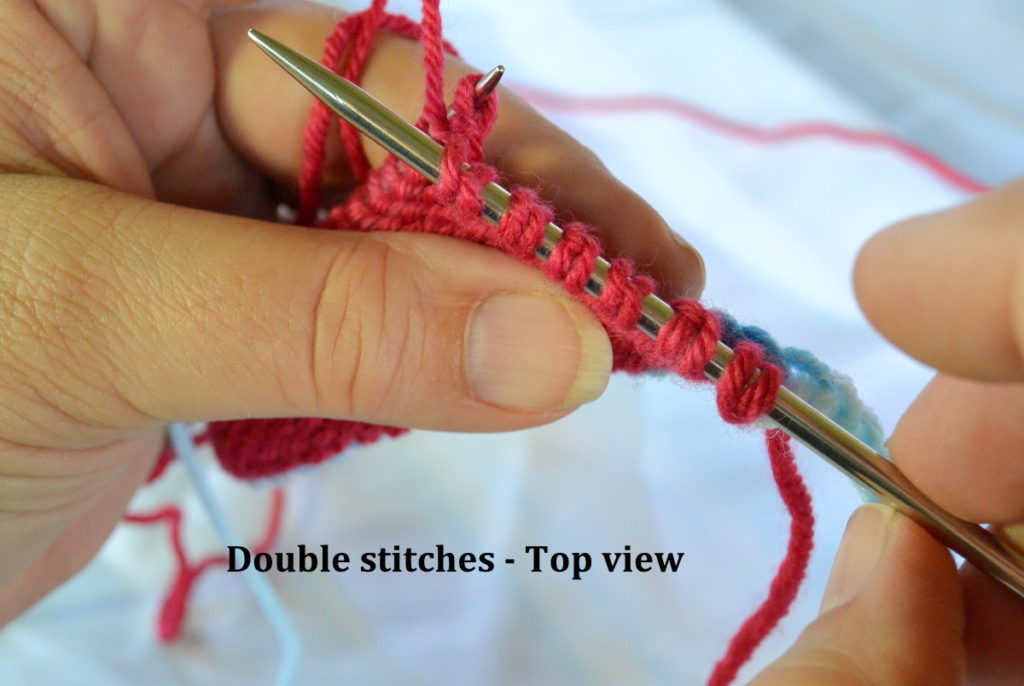
Double stitches - top view

Now, knit or purl the next stitch (as the pattern indicates) to lock the Double Stitch in place. That’s it. One Double Stitch created. No wrapping, no slip stitch tango, no muss, no fuss.  The Double Stitch sits just a little differently depending on whether you worked a knit or a purl as the next stitch, but the magic works just the same.


To work a short row toe, purl to the end of your cast on row and turn. Make a Double Stitch of the first stitch (the one that should have been wrapped), knit to the end of the next row, and turn. Make another Double Stitch, purl to the first Double Stitch, and turn. Make another Double Stitch, knit to the next Double Stitch, turn. Now, continue making a new Double Stitch, knitting or purling to the next Double Stitch, and turning until you have reached the number of stitches that are to be left unworked in the center of the heel. Take a moment to admire your lovely polygon, delighting in the fact that you haven’t wrapped a single stitch, and noticing the magic practically emanating from the stitches.
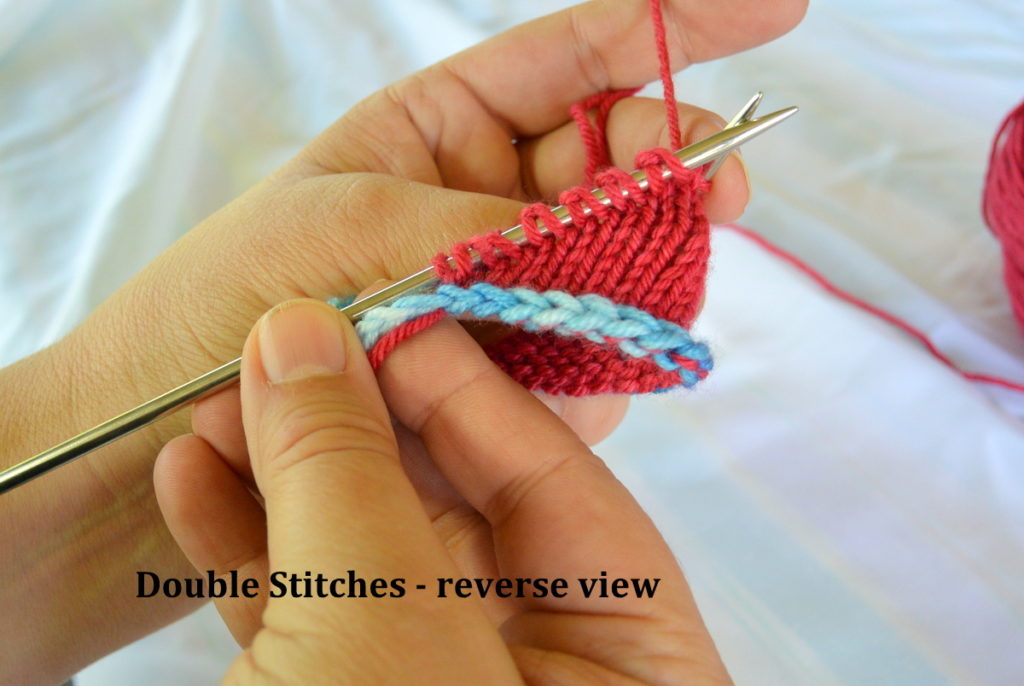
Double stitches (reverse view)

Time to “unwrap” those slipped stitches that you didn’t wrap. The next steps will vary a little from pattern to pattern, depending on whether you have an odd or even number of unworked stitches between the Double Stitches. I will show you what to do when there is an even number remaining because that process requires one extra step. If you have an odd number remaining, just omit the first step.

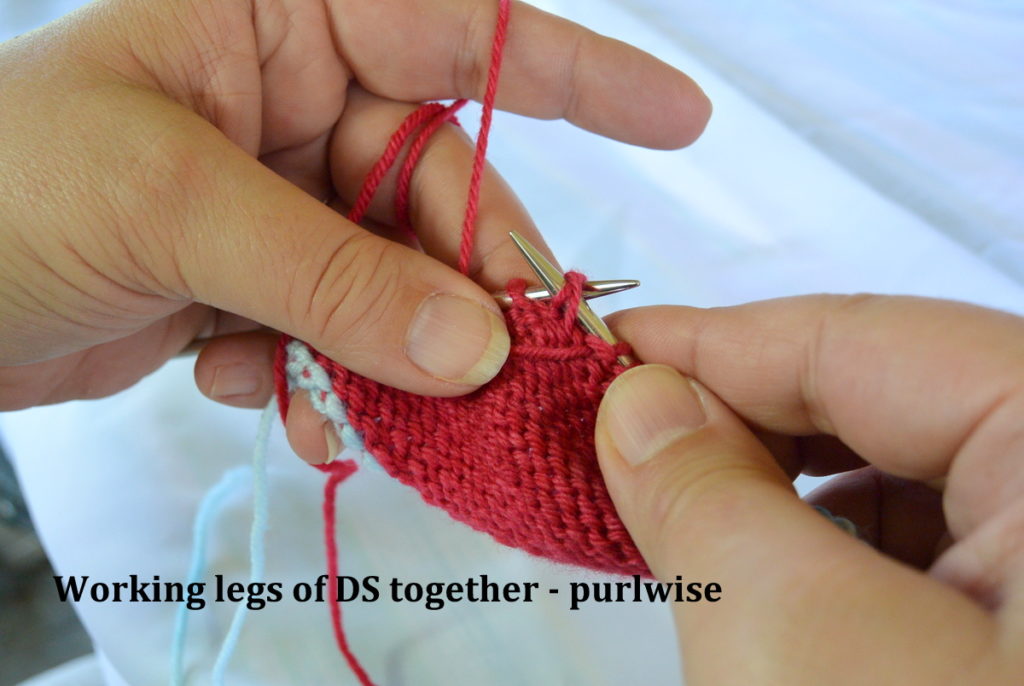
In our example, we ended our toe on a Wrong Side row. With your work turned, make a Double Stitch and knit to the next Double Stitch in the row. Work that Double Stitch by knitting both legs of the stitch together the way you would k2tog but without actually decreasing a stitch.
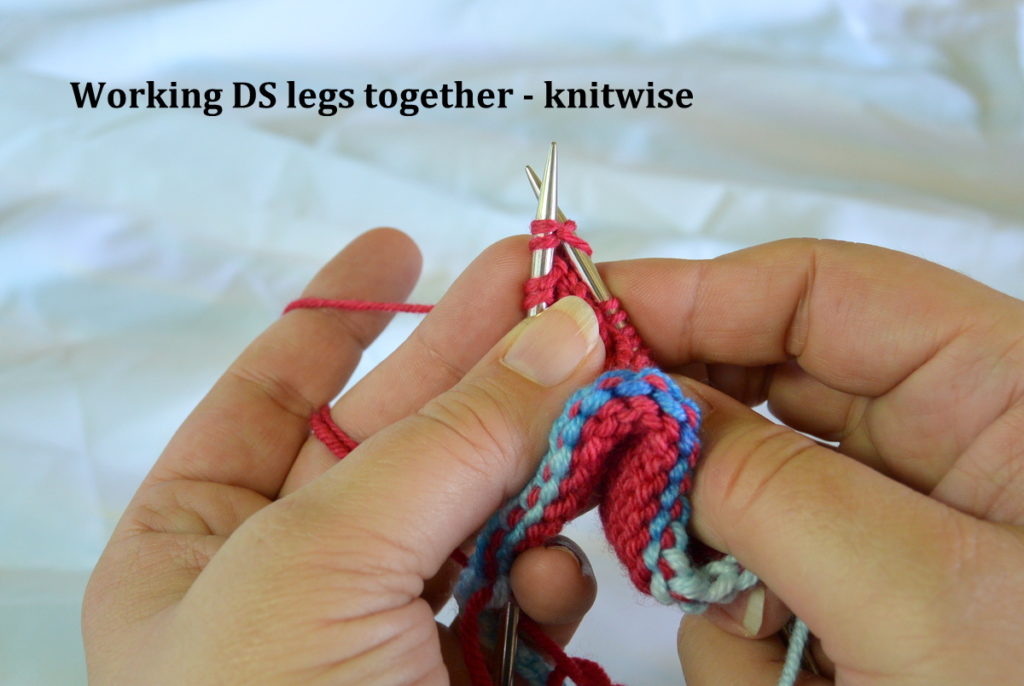
 

Working DS legs together knitwise

Working legs of DS together - purlwise

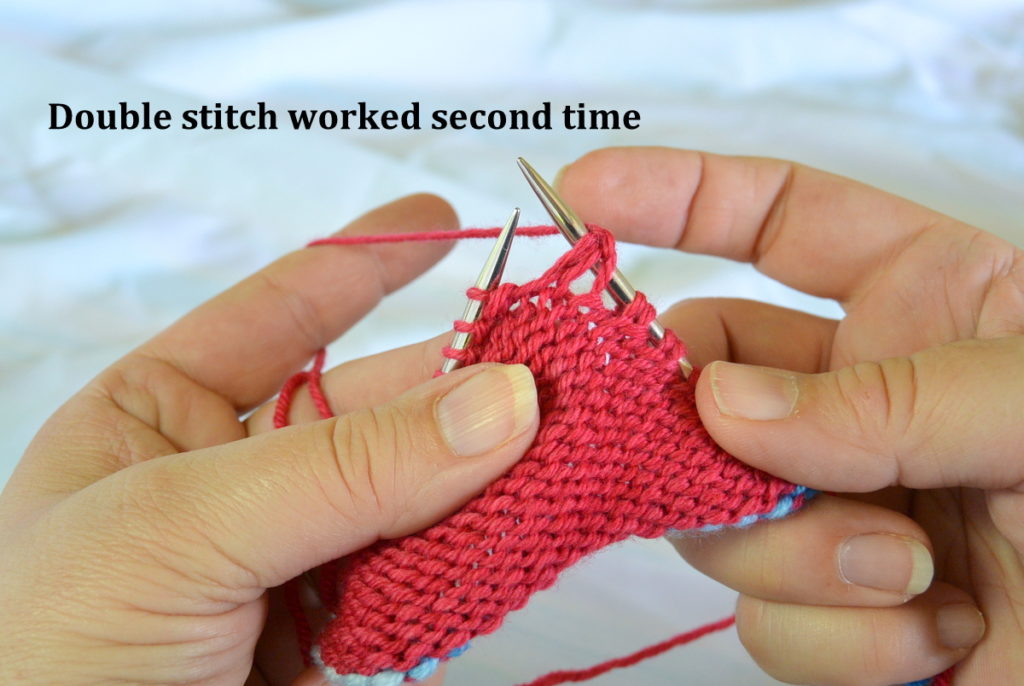
Turn your work. Make a double stitch. Yes, I know that is the Double Stitch you just worked and it looks a little bulky but you’ve trusted me this far so stay with me a little longer.
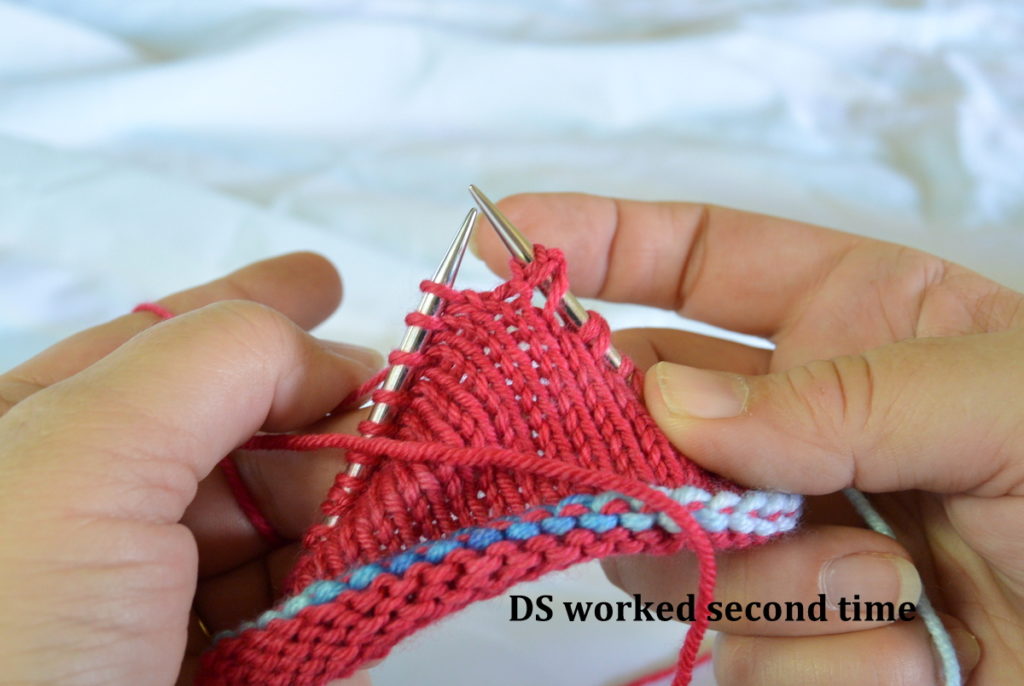
DS worked second time - knitwise

Double Stitch worked second time - purlwise

Purl to the next Double Stitch, then work the next TWO Double Stitches just like you did in the last row; purling two legs together as a single stitch. Turn. Make a new Double Stitch (from the last Double Stitch worked), knit to the next Double Stitch, work the next two Double Stitches as you did before, and turn. Repeat this process, creating one new Double Stitch and working two Double Stitches, until you have worked all the Double Stitches. On the last turn, you won’t need to create a new Double Stitch.
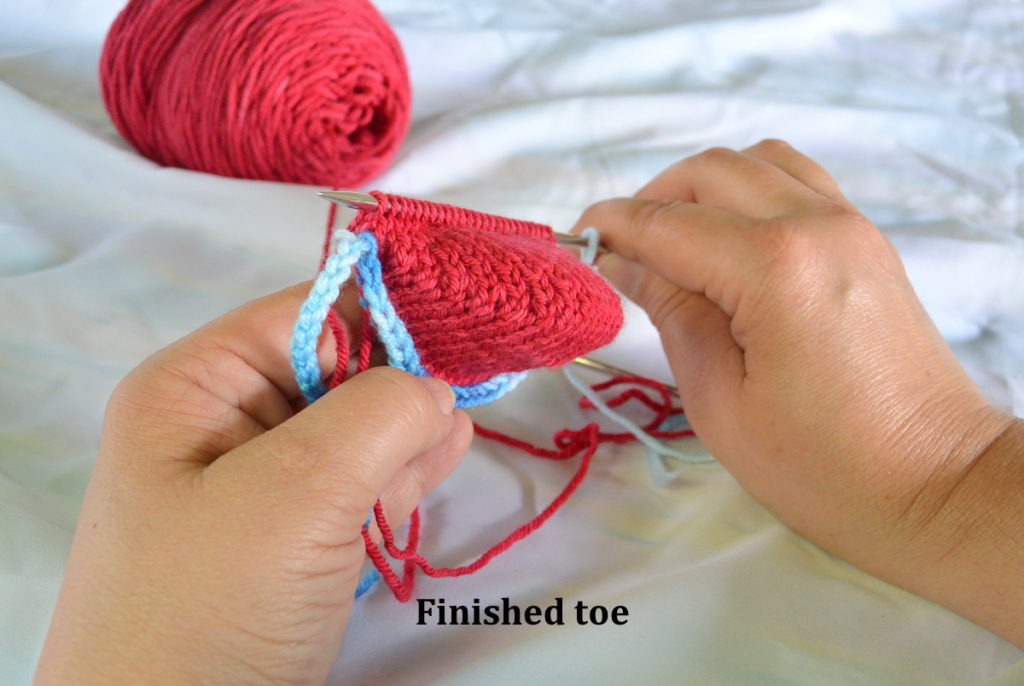
Finished short row toe


You have my permission to squeeeee with joy over your beautiful toe. Notice that the turning points are nicely closed (much better than the results from even double wrapped Wrap & Turn short rows). And if you feel the “seam” (for lack of a better word), you will see that it isn’t as bulky as you thought it would be.
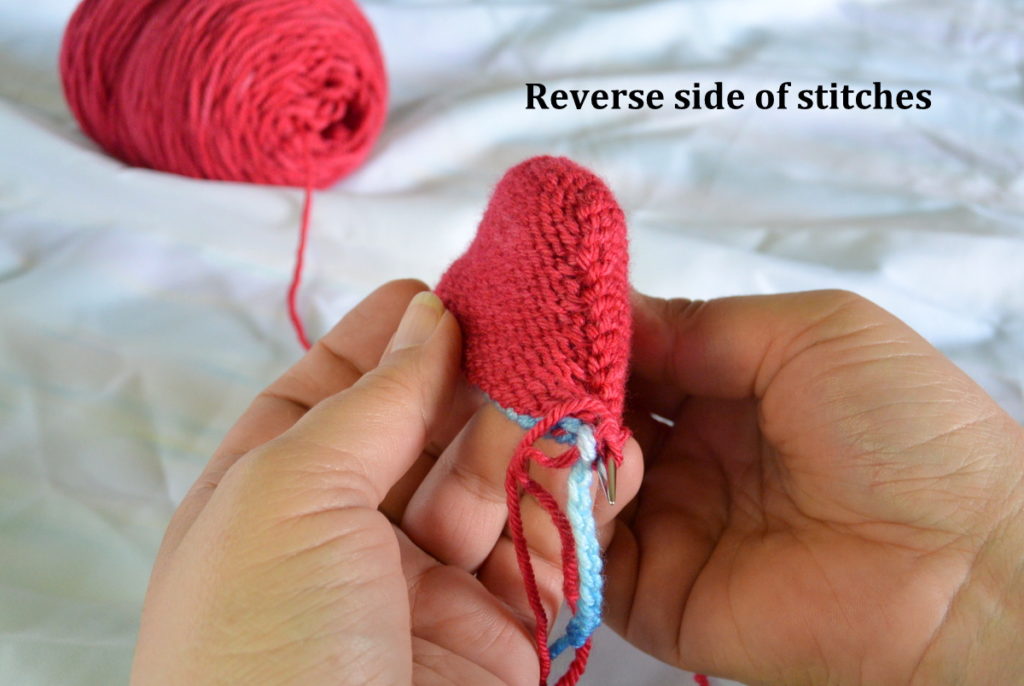
Reverse side of short row toe

See? I told you it was magical!

Want a pattern to try out this technique? Hold the Pickles is perfect.

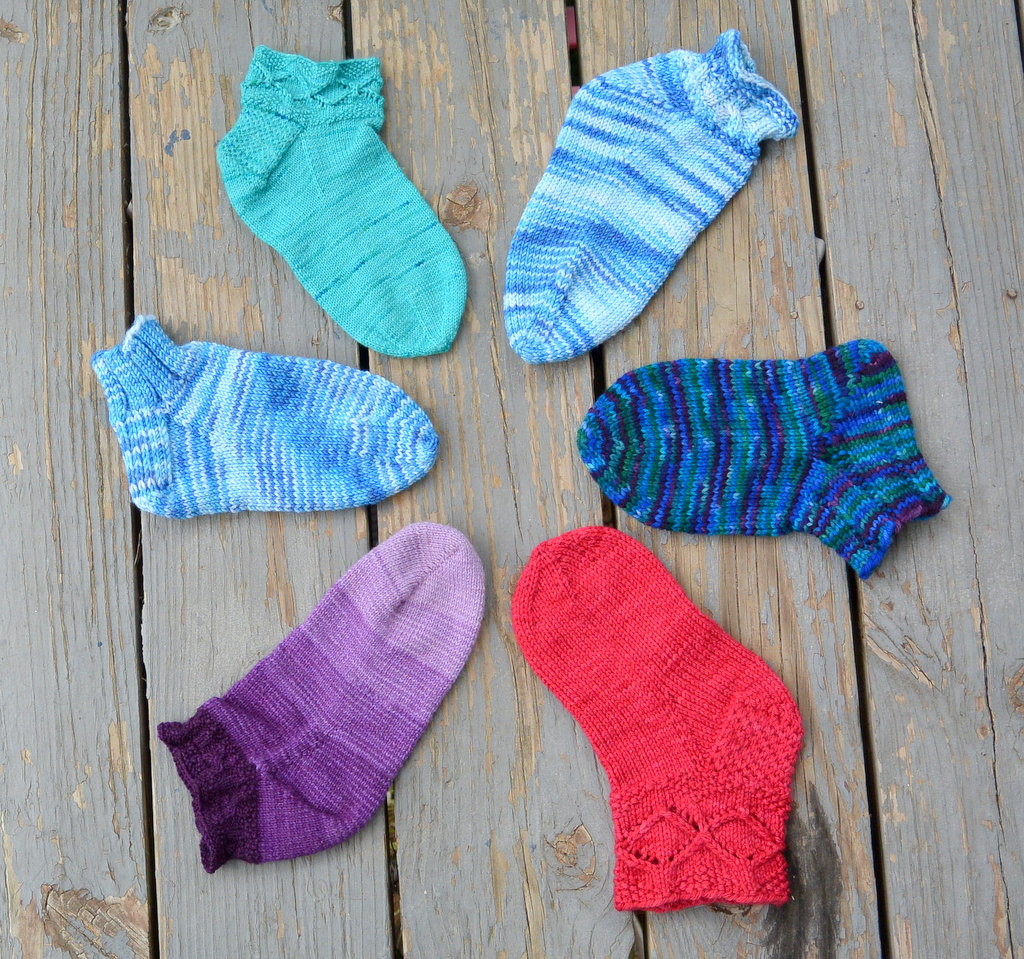
6 sock options for Hold the Pickles

Hold the Pickles

A versatile sock with something for everyone

In “ye olde” days, there was a burger chain that claimed you could “have it your way.” This sock pattern will let you “have it your way” too. Mix and match cuff, heel, toe, and even yarn weight to create a sock exactly your way.

Though it sounds hard to believe, this pattern really does include enough options for you to make more than a dozen different socks – cuff down and toe up instructions, with a variety of heel, toe, and cuff options. You also have a choice of using worsted or fingering weight yarn. It is like getting 18 patterns for the price of one!

Worked in worsted weight yarn, it is a super quick gift or a cozy around-the-house sock; worked in fingering weight, it is the perfect ankle sock.

What’s included?

Pattern contains full instructions for both fingering or worsted weight yarns with customization options for the best possible fit. It also includes full cuff down and toe up instructions with 3 different cuff options, 5 different heel options, and 5 different toes. Hate Kitchener stitch? Use the star or short row toe. Only like toe up? You’ll have 2 toe and 2 heel options. You can knit socks for everyone in the family without ever changing patterns.

Depending on options chosen, suitable for the advanced beginner to intermediate knitter. Skills required – basic stitches, knitting in the round, increases, decreases, slipped stitches, pick up and knit, short rows. Additional skills for some versions – grafting, basic knowledge of cables and lace, German short rows.

Bonus

If you sign up for my newsletter (link to left or form on right side of page), you will receive a free copy of the cuff down, ribbed cuff sock pattern via email. Included in the email will be a coupon code for a discount on the complete pattern.

Available through Ravelry and Etsy.

$5.00


add to cart