Home » Knitting » Page 28

Category: Knitting

Set them Free

I have been on a finishing fury lately. Within the last two weeks I completed several gift items that have been on the back burners. They have all now been set free (given to their designated recipients).

First was Ms Judy’s Shawl

Like the chopstick that I am using to close it?

A while back Ms. Judy gave me a box full of acrylic yarn. There were a number of blue skeins in the box and she asked me to knit her a shawl from the blue. Since that time I have been looking for a pattern that would work for acrylic, for multiple colors since I didn’t have enough yarn in any one color and was easy but not boring. I finally found it with Feather and Fan.

Ms. Judy was thrilled with it.

Next up was Ms Juanita’s socks.

Ms. Juanita actually asked for a pair of socks while I was deciding on a shawl to knit her. This pair was knit as part of the First Time Socknittters KAL Yahoo group.

Finally, was Ms. Emerald’s Shawl.

This project started as a scarf. But Ms. Emerald saw my summer shawlette and adored it so the project got changed in mid-knit.

In hindsight, this particular pattern would have been happier knit from wool. The acrylic did not like the double decreases. But it will be very soft and warm without requiring hand washing and blocking. Should I knit another in acrylic I will substitute paired decreases for the double decreases.


Project Details

Ms. Judy’s Shawl
Pattern – Modification of Feather and Fan Comfort Shawl by Sarah Bradberry
Yarn – Miscellaneous acrylic from stash in blues and white
Needle – Size 11

Ms. Juanita’s sock
Pattern – Funky hybrid of Wendy Johnson’s Basic Gusseted heel Toe up and Broadripple socks
Yarn – Lion Brand Magic Stripes Spring Print colorway
Needles – Size 2

Ms. Emerald’s Lace Shawl
Pattern – Modification of Summer Lace Shawlette by Sandi Wiseheart
Yarn – Bernat Softee Chunky
Needles – Size 11

Design (Origins Part I)

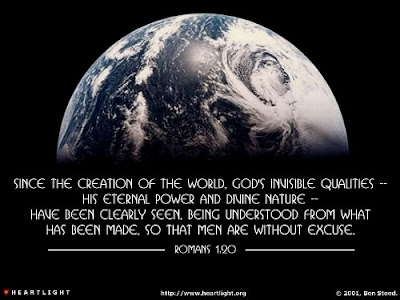
I have been dabbling in knitting design (for evidence see here, here or here)and I have come to the conclusion that designing is actually hard work. It takes a significant amount of creativity and thought to convert an idea into a concrete item and then to put that information into a format that someone else can understand and appreciate. It is not something that happens by accident or without a bit of effort. Yet, there are those who say just the opposite about the world in which we live. There are those who think that the beauties and wonders of this universe are just happy accidents that occurred over billions and billions of years. But is that really true?

If you will kindly indulge me, I would like to share with you my journey to a deeper understanding of the origins of the universe. This has been a long and often difficult process for me. One that frequently required to rethink what I had been taught. Since this was a rather lengthy process, I will not attempt to write it all in one post.

First, let me give tell you a little bit about my background. I was reared in a semi-religious home. My family was sporadic in church attendance so while I had been given a reasonable exposure to the Bible, it was not something that was deeply ingrained in me. When I went to college, I, for the most part, gave up religion. I found “churches” to be full of hypocrites and I came to doubt most of what I was taught as a child.

Throughout elementary and high school my favorite subject was always science so when I went to college, science was the natural course of study for me. Though my emphasis changed several times while I was in college (shifting from a medical to a research orientation), my major field of study was always science (biology/math major; chemistry minor). There was a precision and order to the sciences that I found very appealing. There was a beauty to the way one branch of science interacted with another that I found fascinating.

The course of study in any science field is pretty strenuous. There aren’t a lot of “goof-off “ classes and most of the allowed electives are science electives. So most semesters, I took at least one biology, one chemistry and one math and usually one other science (physics, geology, etc). Biology, being the science of life, gave me more opportunity to study the how life began, how species are interrelated and how it all fits together.

The rigorousness of a biology program doesn’t provide one much time to digest what is learned. Mostly, you were stuffing the information into your head as quickly as possible in order to spit it back out on the tests. There simply wasn’t time to question things, because you were too busy learning a of myriad facts – phyla, genera, species, bones, muscles, tissues, organs, etc. Your head was so full of facts that there was little room for logical reasoning. It was in this environment that I learned the theory of evolution and the general theories on the origin of the universe.

I will begin by explaining in simple terms the origin of the universe from the biological standpoint. According to what I was taught, the universe began when a ball of matter inexplicably exploded causing a great release of energy and sending bits of itself spiraling outward throughout the universe. Some bits of this matter formed stars, others formed planets, still others formed asteroids or other various space rocks. As the spiraling continued, some of the bits of miscellaneous space debris began developing orbits around the various stars, giving rise to solar systems. Through a series of random occurrences, the earth developed an orbit around its star (our sun) at a location that was neither too close nor too far from its source of heat and light. That unique location allowed the formation of certain organic (carbon-based) compounds in a sort of primordial soup. That group of chemicals was then radically changed by some major dynamic event (a lightning strike, for instance) to become the first living organism. Over a period of hundreds of billions of years, this organism evolved from a single cell creature to a multi-celled organism and eventually, through a combination of random mutation and natural selection, into the thousands of species that we see today. That is the short version.

There is some biological evidence that would seem to support this theory. For example, the similarity of features between one species and another would seem to suggest that they were once related. The bone structure of the frog, for example, is remarkable like that of the human. A pig fetus develops in a manner similar to a human. Is this proof that these radically different species developed from common ancestors? Or is there another possible solution?

In my study of knitting design, I have come to realize that I can recognize certain style elements of a particular designer. I can look at a pattern and often know who the designer is based on the overall style or certain unique design elements of the item. Likewise, there is also a similarity between the different projects of architects, painters, sculptors, etc. Is it not possible then, that the reason there are so many similarities between one species of animal and another is simply that they had the same designer? Is it possible that rather than the elaborate theories of evolution, that it is possible that the earth could actually have been created exactly the way the Bible claims?

We will explore these ideas in the coming posts. I am hoping that you will enter these studies with an open mind. I admit to a certain amount of bias when I began searching for these answers. As I college student, I tended to accept the word of my professors without question. I hope that you will enter into this study with the desire to follow where the evidence leads.

Oops!

This winter was a tough one for my family. Consequently, there are several things that I should have done that I forgot to do. One of those things was regularly updating my blog and website. Another was to award contest prizes for the Winter Blossoms contest. If you entered the contest, please send me your snail address and I will send you some sort of prize – some teas and whatever other goodies I can find – I will probably skip the mug that I originally planned to send since it is a bit late for Christmas mugs. Don’t know exactly what at this point but you will get a prize. Send your snail mail addresses to this email address tabitha AT tabithasheart DOT com (you know what to do with the AT and DOT). Sorry about the delay. Unfortunately, sometimes life happens.

A Different Take on Circular Heels

I have developed a new technique that will revolutionize the world of sock knitting making it possible for even babies to knit. It requires no needles and you merely have to THINK the pattern in order to knit a sock. I call it Think Knitting.

If you don’t realize that this is April Fool’s Day by now, then April Fool. But if you have been anywhere on the internet, you probably already realized it. I hope you have all had as much fun as I have checking out the pranks all over the web. Ravelry has been especially festive with all the hats, parrots, monkeys and various other fun stuff.

But seriously folks, I do have some socks to share with you. These I knitted for SmallFry.

And I do have a different take, at least for me, on the traditional, top down heel when knitting two socks at once on circular needles. I have had an on-again-off-again relationship with circular needles for sock knitting. I liked the portability as well as the ability to knit both socks at once but I hated, detested, despised knitting heels on circulars. All of the instructions I have found are the same, whether for one circular or two. Knit one heel completely and then knit the other heel. Somehow, I always ended up having to reposition stitches somewhere along the line. I have always found this method awkward and frustrating especially with my preferred 32 inch needle length. I normally resorted to working the heel on dpns or using a dpn to pick up the gusset stitches. The process was just too awkward otherwise. However, this is just not an ideal situation for obvious reasons.

But before I totally tossed the circular method, I decided to try something different, something I hadn’t stumbled upon before. The worse that could happen was that I would have to frog the heels and reknit them on dpns, right? Surprisingly, I found that my method worked much better for me for heels on circulars. I didn’t even have to use a dpn once to complete a both heels. I finished the pair for SmallFry in record time. Just in case this was some sort of fluke, I tried the same technique on the socks I was knitting for Preteena. Again, I found the technique a faster, less frustrating method for knitting heels on circular needles. Since I have not seen this method posted anywhere else, I thought you might benefit from my “discover” too (my apologies to whoever might have thought of this before me – someone probably has).


Simultaneous Circular Heels
I have always questioned why it was necessary to knit one heel at a time when knitting two socks on circulars. There didn’t seem to be anything other then the actual heel turn that wouldn’t work together so here is what I tried.

Set up
When you are working on circulars all your heel stitches are generally on the back needle and all the top-of-foot stitches are on the front needle (or on the front and back of the same needle when using Magic Loop). Complete the last row of the leg at the point where you will begin the heel. DO NOT TURN! For clarity, when looking at the sock after the completion of this last round, the sock that is currently on the right will be referred to as the First sock and the sock currently on the left will be referred to as the Second sock. This naming will continue regardless of the actual orientation of the socks. If you like, you can mark the First sock (the one currently on the right) with a split ring stitch marker, a loop of contrasting yarn or some other method. This sounds confusing when writing it down but I promise it will make sense when you have socks on the needle.

Heel Flap
To repeat, when you finish the last row of the leg, do not turn your sock. Instead, slip the first stitch of the first sock and purl across the row. Drop that yarn, pick up the yarn for the second sock, position the stitches on the needle if necessary, then slip the first stitch of the second sock and purl across that row. Turn your work. Now Sl K1 across the right (public) side of the second sock ending with a K1. Now repeat this for the first sock. Continue repeating these two rows working alternately on the first and second socks until you have completed the heel flap for both socks ending with a knit row. You should have ended with the first sock. If you prefer a different heel flap, like eye of partridge, feel free to substitute it.

Heel Turn
You will work the heel turns, one at a time. The instructions for the turn will be for a rounded heel. On the first sock, slip the first stitch and purl to two stitches after the half way point, for a 32 stitch heel flap, this would be 18 stitches. Purl two stitches together and purl one more stitch. Turn without working the remaining stitches on the needle. Slip the first stitch, knit 5 stitches, knit two stitches together and knit one more stitch and turn. Slip the first stitch, purl to one stitch before the gap where you turned, purl together the two stitches on either side of the gap, purl one, turn. Slip the first stitch, knit to one stitch before the gap, knit together one stitch on each side of the gap, knit one, turn. Repeat the last two rows until you have worked all the stitches on the purl side of the flap but have one remaining unworked stitch on the knit side. Do not work the knit row yet. Drop the yarn for first sock and pick up yarn for second sock positioning stitches on the left needle. Now repeat the heel turn for the second sock, in the same manner as the first sock.

Gusset Pick Up
Knit across the last row of the second sock, knitting together the last two stitches around the last gap thereby completing the heel turn (you have no stitches remaining on the left needle. Now pick up and knit the slipped stitches along the left edge of the heel flap adding the desired number of extra stitches for the second sock (for a 32 stitch gusset, I usually pick up 17 stitches – 16 slipped stitches plus one extra stitch between the last slipped stitch and the first stitch on the front of the sock). Drop yarn. Pick up yarn for first sock and position stitches. Knit across the last row completing the heel turn by knitting the last two stitches together for the first sock and then pick up the stitches on the left side of the gusset for the first sock. Now you are ready to rejoin your stitches for knitting in the round. Knit across the front of the sock in the appropriate pattern on the first sock. Knit across the front of the second sock in appropriate pattern. Pick up and knit the gusset stitches on the opposite side of heel flap for the second sock (you will pick up the same number of stitches as on the left side of the gusset -17 in our example). Knit across the top of the heel flap and knit through the back loops of the stitches that you picked up on the left side of the gusset. (This will make one side of your sock one row longer than the other but I have not noticed that it causes any problems and it makes it easier to remember when to decrease.) Drop the yarn for the second sock. Pick the yarn for the first sock. Now pick up the stitches on the second side of the gusset for this sock making sure to tighten the first two stitches. Knit across the top of the heel turn. Knit through the back loop of the stitches on the left side of the gusset.

Gusset Decreases

Knit across the top of foot in pattern. Knit the first row of gusset as follows: K1tbl, SSK, Ktlb for all stitches on the gusset. Knit across heel turn. Knit to last three stitches. Knit 2 together, Knit 1.

Remainder of gusset
Round 1 Knit front in pattern. Knit back.
Round 2 Knit front in pattern. K1 SSK K to last three stitches K2tog K1
Repeat these two rounds until you have the same number of stitches on the front and back of the needle (32 stitches in our example). Now continue your sock to the toe as normal.
Voila! Nearly simultaneous heels on circular needles.

Knitting is Easy, Design is Hard

The craziness hasn’t stopped around here. One day it’s 75o the next day is it is 35o. I love springtime in the south. Always a surprise. I have been knitting like crazy but don’t have any completed objects to show you right now. One reason is that most of the things I am working on are still in progress. Another reason is that the few things that I have completed haven’t been photographed yet. But the main reason for that is that I have also been spending time lately naming designs and writing patterns. I have a couple of things nearly ready to post but I thought I would share what I do have ready.

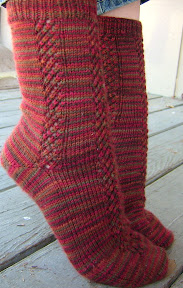
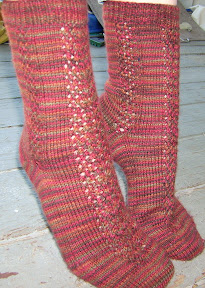
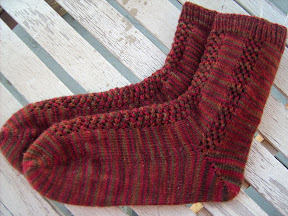
I have discovered that I am really not very talented at naming patterns. I have tried a dozen names out for my sock and I still don’t know if I am happy with it but my sock does have a name. May I present to you
Climbing Lace Sock

I have finally completed writing out the pattern for my first sock design. I have a totally knew respect for sock designers. It is far easier to knit a new design than it is to write the pattern so someone else can follow it. And I realize this instant that with all the work that I put into the pattern, I forgot to include the stinking gauge which happens to be 8 stitches per inch. Oh well, I guess I cannot be perfect all the time.

So if you are interested in having a pattern for my first sock design, you may download the pattern here.

A word of warning, the pattern has not been test knit but Hey, it’s a free pattern. If you find an error, please let me know so I can correct it. Hope you enjoy.

ETA: Pattern Errata
The gauge was not included in the pattern – it should be 8 stitches per inch and 12 rows per inch. There is an error on Row 1 of the Leg pattern. The first K11 should be K7 so that the lace pattern will be centered. As soon as my friend Kimberly finishes knitting it so we are sure that we have all the mistakes, I will upload a corrected copy but in the mean time you have all the corrections that I know about.