Home » Knitting » Page 2

Category: Knitting

Supplies gathered for garter tab cast-on

Seamless Garter Tab Cast-on (Without Tears)

One of the things I do regularly is scroll through knitting groups on social media to see what techniques or pattern wording knitters are struggling with. I then use this information to make my own patterns better and suggest things to help you make yours better too. Something I hear a lot of people whining about is the garter tab cast-on. Some people utterly despise this rather innocuous cast on. Why all the hate? I decided to investigate.

The Problem

The complaints about garter tab cast-on come down to two main issues – the crochet provisional cast-on and picking up stitches along a cast-on edge. The grumbling about a provisional cast-on centers around the technique. First, it requires you to find a crochet hook, then to remember how to use a crochet hook to do a knitting cast-on (since it isn’t a technique most knitters use regularly), and then to remember which end of the cast-on to use for unzipping (because who wants to spend time picking out scrap yarn on stitch at a time). The grousing about the second method is that it leaves a seam or a ridge on one side of the work that rather spoils the uniformity of the edge. And to be honest, picking up stitches along a cast-on edge is fiddly at best.

The Theory

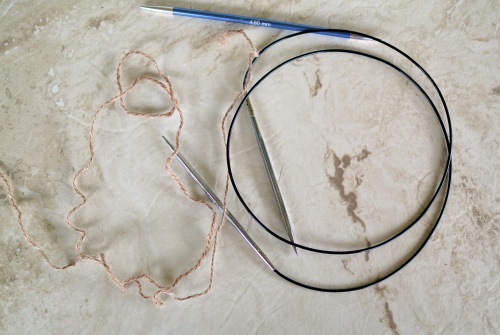
So, I set about finding a way to do a garter tab cast-on that didn’t involve picking up stitches on a cast-on edge OR finding a crochet hook. Being an avid sock knitter, I wondered if the provisional cast-ons used for beginning toe-up socks could be applied. Turkish, Figure Eight, and Judy’s Magic Cast-ons are all create beautifully seamless, so I couldn’t see why it wouldn’t work. Armed with a double pointed needle (dpn), a circular needle, and my yarn, I set out to test the theory.

Before you tell me that finding a dpn is just as much trouble as finding a crochet hook, the following technique will work with any type of spare knitting needle, a cable needle, a tapestry needle, or if you don’t have one of those a bamboo skewer, a pencil, a toothpick, or an orange stick from your manicure kit will work if that’s all you have available. It will only have to hold a few stitches until you can knit the first row.

The Technique

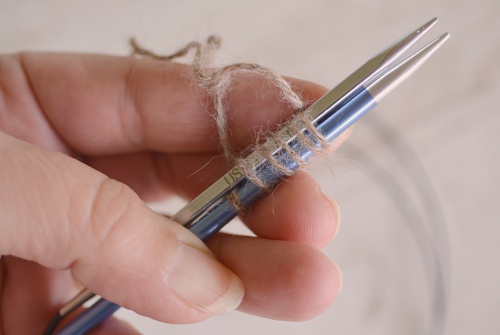
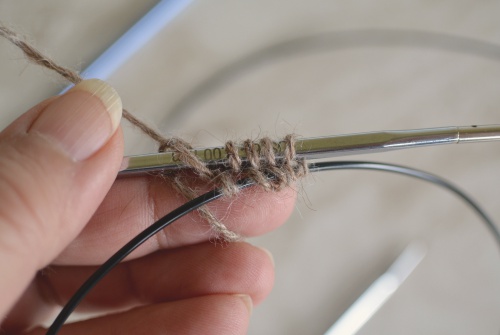
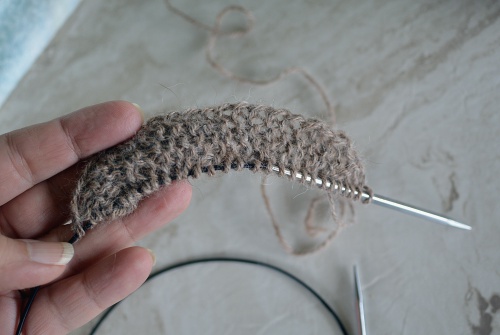
To begin, hold the dpn and one end of the circular needle side by side. Then, cast on the required number of stitches using your favorite toe-up sock cast on. In the sample, I cast on five stitches using the Turkish cast-on method. I choose Turkish because it is the fastest (just wrap the yarn around the needle) but if you like Judy’s Magic or Figure Eight cast-on better, either one of those will work equally well.

Turkish cast on

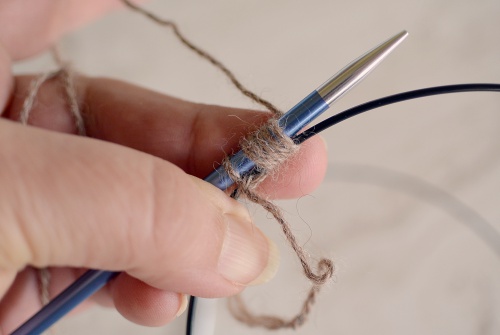
Next, slide the circular needle so half the cast-on stitches are resting on the cord and the other half are on the needle ready to knit.

Slide half the stitches to the circular needle cord.

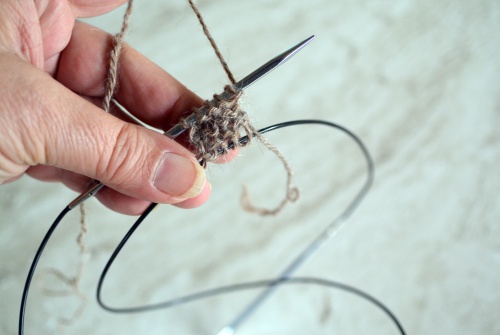
Using the circular needle as the working needle, knit the first half of the cast-on stitches (I knit 5 stitches). If you were knitting a sock, you would now rotate the work and knit the other half of the stitches but instead, you will leave those stitches on the cord and ignore them for a bit.

Knit the first half of the cast-on stitches

Turn your work, because you will be working flat for a bit, and knit the 5 stitches you just knit, leaving the other half of the cast-on held on the cord for now.

Knitting the garter tab (leaving the second half of the cast-on held on the cord.

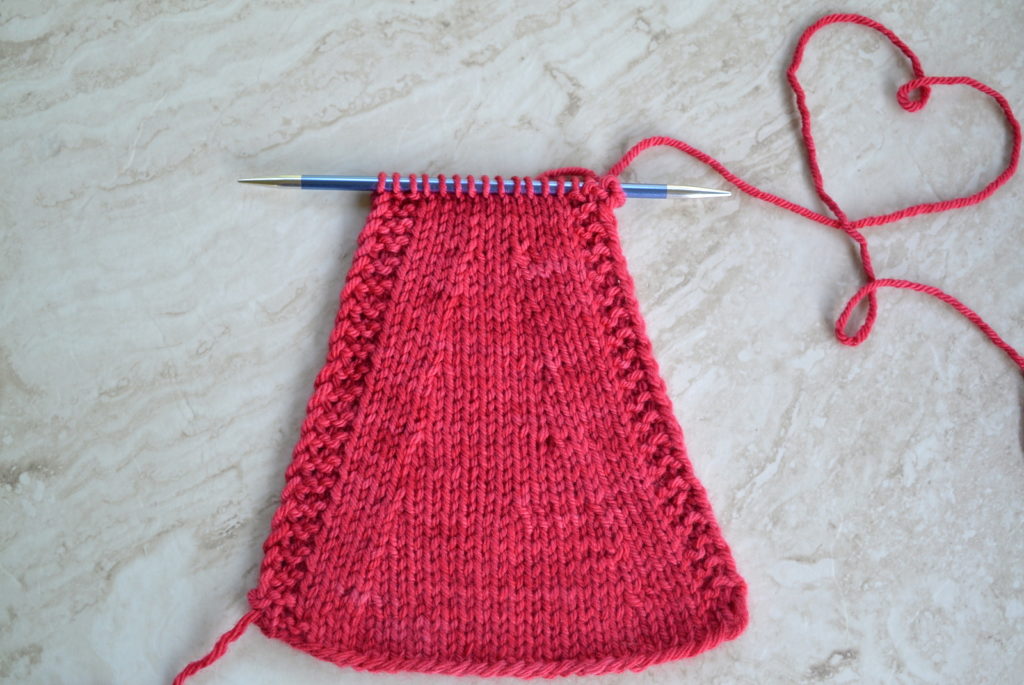
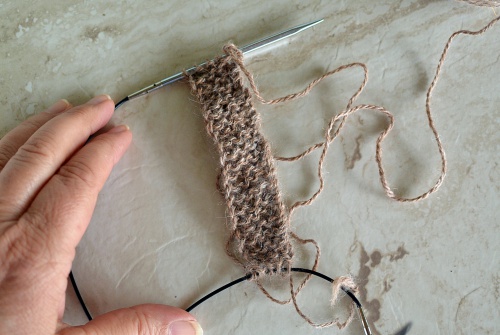
Continue working flat until you have knit the number of rows required by the pattern (usually twice the number of stitches that you will pick up along the edge). Here I have knit 30 rows because I plan to pick up 15 stitches along the garter edge. You now have a long strip of knitting with half of the live stitches on the needle and half of the live stitches resting on the needle cord.

Garter tab complete

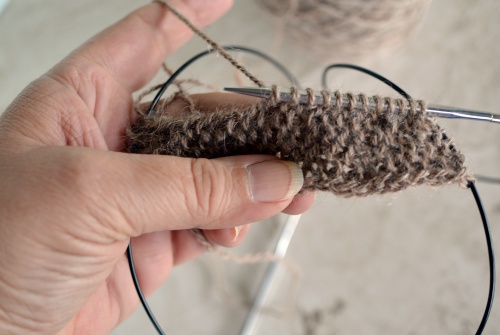
Now, rotate your work 90-degrees clockwise and pick up one stitch for each garter ridge on the edge of the piece. In my example, I picked up 10 stitches.

Picking up stitches along the edge of the garter tab.

Now, you are back around to the stitches held on the cord.

Back to the stitches held on the cord.

Slide those stitches onto the left needle.

Slide second half of cast-on stitches onto the needle.

Now, knit the stitches that formed the other half of your provisional cast on.

Completed garter tab cast-on.

Boom! You have finished your garter tab cast-on without having to pick up cast-on stitches or find a crochet hook. This approach produces a seamless tab that is completely reversible.

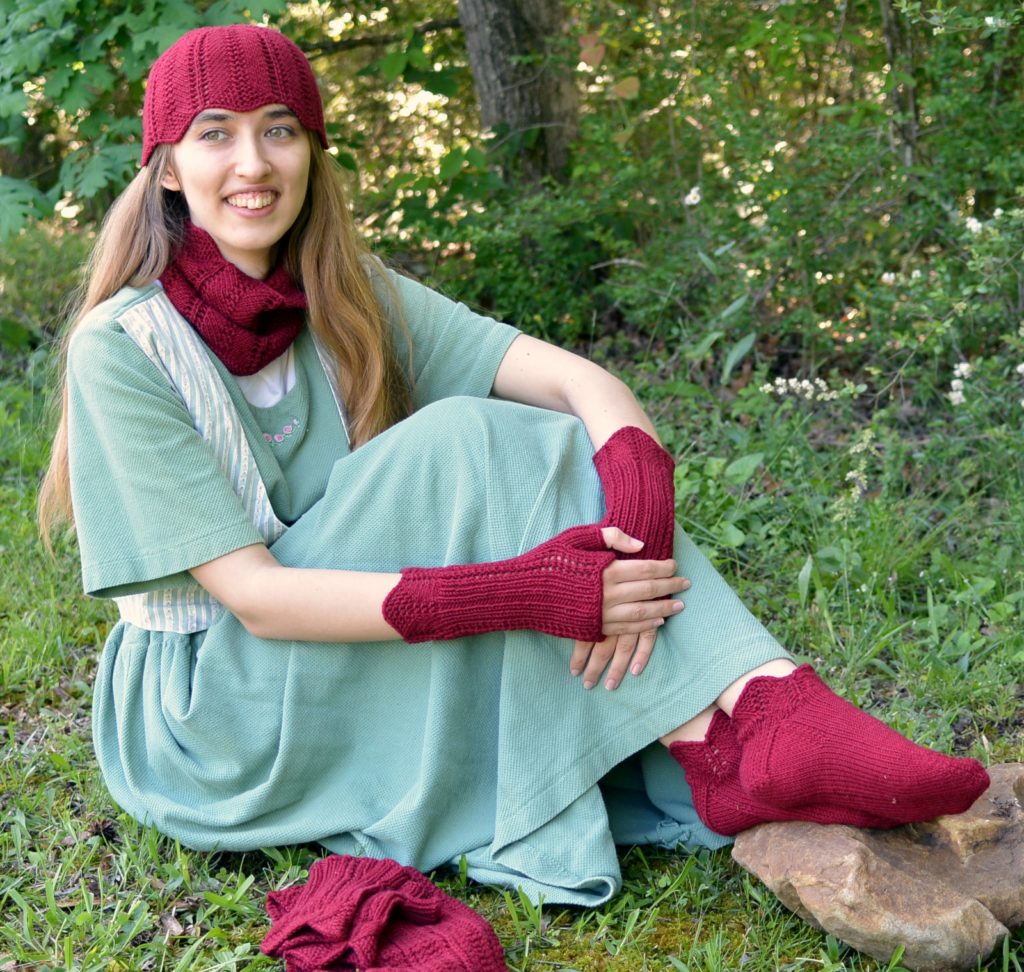
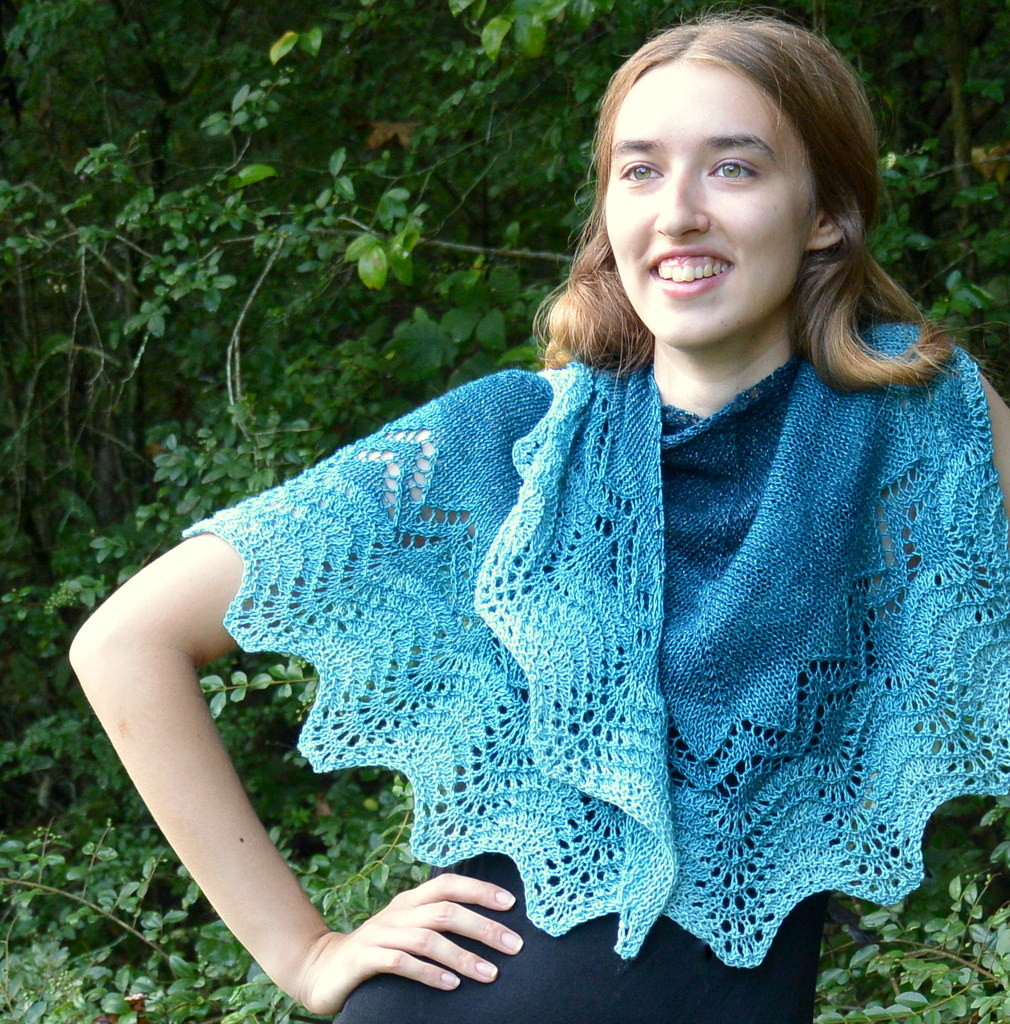
You may commence your regular shawl knitting now.


Measuring knitting gauge.

Round and Round – Unit Conversion and Its Impact on Knitting Gauge

Not long ago, I stumbled upon a discussion of unit conversion in knitting patterns.  There was some concern that converting units from imperial to metric units introduced error in a pattern. It was even suggested that each unit should be calculated separately to prevent error. But I started checking the math and discovered that sometimes simpler is better.

Read more

Sample of ssk and k2tog decreases

So How DO You Work an SSK?- A Tutorial

I am constantly amazed at how many ways people describe and work the left leaning decrease known as ssk. I am beginning to think every knitter has her own variation of it. Being the curious sort, I have been researching the different methods you see the stitch presented. I wanted to share a few of these with you.

The wrong way

I know in knitting we say there are no “wrong” ways but with this stitch there is indeed one wrong way. Many new knitters see the definition of ssk as slip, slip knit so they slip 2 stitches, then knit one. While there is nothing wrong with working that sequence in knitting, it does not decrease a stitch so that method is wrong when you are trying to produce a left leaning decrease.

The older way

I discovered quite by accident that ssk is a relatively modern technique in knitting keeping in mind that the craft is centuries old. But if you read vintage knitting patterns you will find ssk conspicuously absent. In older publications, the most common left leaning decreases were sl1, k1, psso (also called skp) and k2tog through the back loop. Some will tell you sl1, k1, psso is the exact same decrease as ssk but that is inaccurate. While they both are left leaning, they do not look the same, nor are they worked in the same manner.

The most common way

The most common definition of ssk is:

Slip 2 stitches one at a time knitwise (this reverses the stitch orientation), place the tip of the left needle in the front of the 2 slipped stitches and knit them together (i.e. working through the back loop of the stitches).

Working the k2tog through the back loop works the stitches without changing their order or orientation.

The not quite as common way

Another fairly common definition you will see for ssk is:

Slip 2 stitches one at a time knitwise, knit the sts together through the back loop. (sometimes the instructions tell you to return the stitches to the left needle).

This produces the same results as the previous method. The only difference is that the definition makes it clearer that you are working the stitches through the back loop and is a little more concise.

The abbreviated but ambiguous way

This one appears on the Craft Yarn Council website and a couple of other websites who use that information for their stitch definitions:

Slip 2 stitches one at a time knitwise, knit these two stitches together.

The concern with this definition is that it either produces a different result or it assumes knowledge. If you work the decrease exactly as written, when you knit those stitches together, you will be reversing the order of the stitches, causing the decrease to lean more to the right than to the left.  That said, to knit those 2 stitches in through the front loop takes a bit of maneuvering. They will need to be transferred back to the left needle to make the k2tog work through the front loop. The more natural way to work it would be to leave the stitches on the right needle and work them through the back loop as defined in the first method so knitters who are accustomed to doing this decrease will work through the back loop instinctively. So, this definition can produce the correct result but it leaves lacks a bit in clarity.

SSK variations compared to k2tog

SSK variations – the matchy-matchy ways

There are many variant ssk techniques that are intended to better match k2tog in patterns with mirrored decreases (like the shoulders of a sweater). Some of them produce results that aren’t significantly different than a plain, old ssk so may not be worth the trouble. And others are so involved that only the most OCD knitters would be willing to go through that many steps just to have their armhole decreases neater. Here they are, in the order I discovered them.

Knitwise/purlwise

I have seen this technique called dozens of different names but the main change between it and the common ssk is that instead of slipping both stitches knitwise, the second stitch is slipped purlwise (or not slipped at all but I will get to that in a minute). The definition becomes:

slip1 knitwise, slip 1 purlwise, knit the 2 slipped stitches together through the back loop.

Slipping that second stitch purlwise flattens out the decrease a little so it matches the k2tog a bit more.

A variation on this that I alluded to in the previous paragraph is:

slip 1 stitch knitwise, return that stitch to the left needle and then k2tog through the back loop.

This keeps the orientation of the second stitch the same as if you had slipped it purlwise but doesn’t stretch the stitch when you work it and it is a little faster because you skip a step.  In my own knitting, I get a neater result this way.

Slip, yank, twist, knit

Techknitter came out with this method (that I will link rather than try to explain. This method removes the excess yarn from the second stitch so that the stitches lie flatter and look more consistent with a k2tog. Honestly, while it does beautifully match the k2tog, unless I am looking at the tutorial I can never remember what stitch I am supposed to yank so I rarely use this method. And if you will notice, I ended up getting a bit of distortion on the next stitch after the sytk.

Slip, Twist, Turn

As with Techknitter’s version, this method from YarnSub does produce beautiful results but at a time-consuming cost. At 14 steps, how many people are going to be able to work in unless they are looking at the tutorial? And how many people are going to be willing to do that many steps to have perfectly matching decreases? Not me.  Turning the work and working a p2tog-tbl was a deal breaker for me. The stitches I did for this tutorial will be the last I work using this method.

K2tog-L

YarnSub has this method of improving the ssk. This is a further attempt by YarnSub to have perfectly matching left leaning decrease. This way produces neater results, is much easier to remember than the previous method, and doesn’t take significantly longer to do than an ssk.  Still, it is tricky to execute and this method is technically no longer an ssk.

Easy but effective

I found this unbelievably easy method on the Cocoknits website. The results are quite lovely. The stitch matches the k2tog nicely and it doesn’t require lots of extra steps. To work it, you work your ssk in the most common method (slipping 2 stitches knitwise and knitting them together through the back loop) or slipping the 2nd stitch purlwise. Then, on the row following the decrease, the stitch created by the decrease is worked through the back loop. In stockinette stitch, you would purl through the back loop. The only tricky part is remembering to work that back loop stitch on the next row.


There you have it. Every way on earth (or at least every way I could find) for working an ssk decrease.

Happy knitting!


Yarn: Smutzerella Yarns Fondle (100% worsted weight merino) in Dress to Arrest

Needles: Knit Pro Zing double pointed needle US 7 /4.5 mm

Photography supervisor: The Ginger Menace (aka NinjaKitty)


Arwen's Elven Accessories in Wine

Arwen Gets a Facelift (pattern updates galore)

Arwen pattern updates

If you have followed me for long, you will know that I have been updating some of my older patterns. Some patterns only needed a simple change of layout. But some of my older patterns, like my popular Arwen series of accessories,  needed a full on facelift since my writing style has changed quite a bit.
I updated Arwen wrap a while ago so the rest of the series was long overdue for their updates. I am happy to say that Arwen has received a complete makeover – updated instructions, new charts, extended sizing, new photography, and other bonuses. My friend Luciana knit fresh samples.  Don’t you love the gorgeous wine colorway of Valley Yarns Northfield? You will be seeing the completely revised and freshly tech edited versions of Arwen cloche, Arwen fingerless gloves, Arwen slipper socks, Arwen cowl, and Arwen keyhole scarf  appearing on Ravelry starting next week. If you already have a copy of the patterns, you will receive the updates automatically. You won’t have to do a thing.  If you don’t have them in your library, grab your copy today before the price increases. Here is the link.

Knitting Tools shop update

You may have noticed my Etsy shop has been in vacation mode for most of the month. This is because I have decided to host my Knitting Tools shop on my website. This change will allow me improve your shopping experience in several ways. It gives me more flexibility to organize my products. And it allows me to offer some great knitting tools that weren’t an option before. You will still see my line of project bags and stitch markers, but coming soon you will also be able to purchase print versions of my patterns and books, pattern kits, and hopefully soon, yarn. And you won’t have to remember another web address when you’re ready to shop!
It will take me a few weeks to get my new shop fully operational. I have the basics set up but now I need to add the important things like products. During this time I will be making a lot of decisions about which products to keep and which to allow to lapse into obscurity. So if you have suggestions of things you would like to see in my new shop or if you’re desperate for a project bag NOW, give me a shout via the Contact tab. Look for further news on this change in the coming weeks here and on social media.

Look out Aragorn. You’re next.


Gulf Breezes Shawl pattern shown in Beachy Keen gradient set

Gulf Breezes Pattern Update

In my continuing effort to bring you the best patterns possible, Gulf Breezes shawl pattern has been completely updated and revised.

What’s New?

Knitters now have the option of working the lace sections with either charted or written instructions. Chart lovers rejoice! I am particularly excited about these charts because they fit so nicely on the page and are so easy to read. I have also included tips for working this pattern in a mini-skein gradient set like The 100th Sheep Color Concepts.

About the pattern

You will find this versatile little shawl will be a wardrobe essential. You can wear it as a wrap for those cool evenings, a topper for a sundress, or a chic kerchief-style scarf, or even wear it tied around the hips as a beach cover up when tied around the hips.

Construction and Required Skills

The shawl is knit from the center back down using a single 100-gram skein of luxury sock yarn. You will love how the unusual shaping helps it stay on the shoulders nicely. Advanced Beginners wanting to stretch their skills and Intermediate knitters who want a relaxing knit will both love the pattern. Techniques required: basic stitches, increases, decreases, simple shaping, basic lace techniques (yo, k2tog, ssk, sk2p, M1, kfb, kfbf). The pattern was written for a 490 yd skein of yarn but is easy to adjust for smaller skeins of yarn or a gradient set.

Thank you to Sarah for the fresh tech edit, and to my testers, Cath, Eliesa, and Melinda for checking the new version.

Pattern available through Ravelry and Etsy. Print copies available through Etsy on request.

$5.95

If you need pattern help or just want to show off your work, visit the Tabitha’s Heart Ravelry group. I love to see finished projects. Use hashtag #tabithasheart on social media and your project may be selected to be featured in my feed. And periodically, I choose a name for a random giveaway.